Oracle Cloud helps to rapidly develop and deploy scalable enterprises, reduce cost of ownership and take advantage of the best that oracle public cloud has to offer.
Java Cloud Service is a component of Oracle's SaaS offering which allows to bring data center directly to cloud. It is a one stop shop for all Java Enterprise Edition needs.
In this blog, we will see the step by step process to create an Oracle Java Cloud Service Instance.
Following are major steps involved -
1) Creation of Trial account - For this blog, we will go with a trial account
2) Generate SSH keys
3) Create an Oracle Database Cloud instance
4) Create an Oracle Java Cloud Service instance
1) Open https://cloud.oracle.com page. Click on the Free Trial button at the top right of the screen as shown in the below screen shot.

2) Following screen would be shown with the steps to create Oracle cloud account. Click on View Details & Sign Up.

3) On the following screen, click on Get started for free button.

4) Fill up the details on the next few screens and submit. A trial account would be created.


7) Once you have successfully logged in, you would see the Dashboard screen.
This way you can successfully create a Trial account.
Before generating the key, choose the parameters as follows.


3) Once the key is generated, screen looks as follows.

4) Enter the passphrase for the key.

5) Key Generator generates two keys - public key and private key.
In order to export private key, click on Conversions -> Export OpenSSH key.

Save the private key in a location with .prv extension.

6) You can find the public key in the "Public key for pasting into OpenSSH authorized_keys file" section. To export the public key, manually copy the key from this section and save it in the same location as private key with .pub extension.


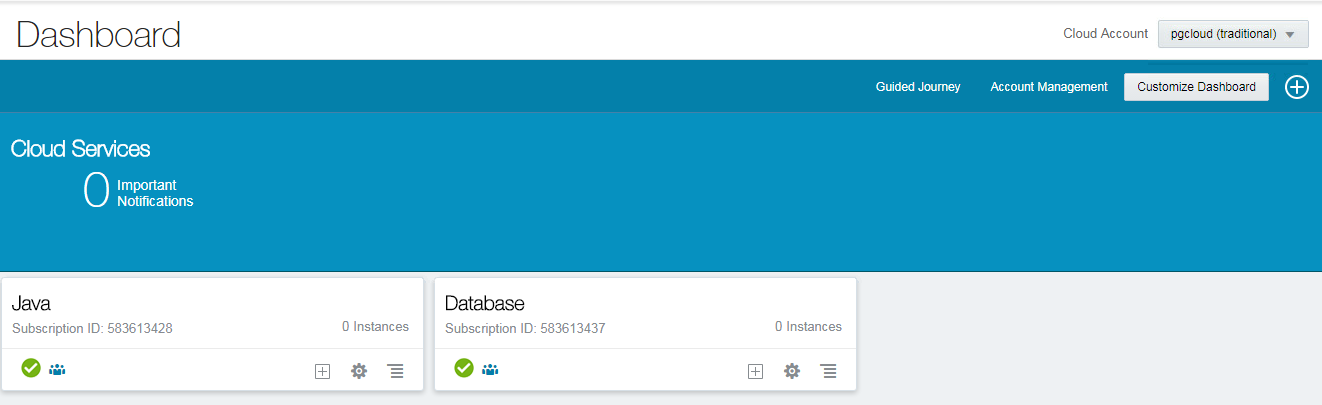
Once done, you would see a dashboard screen. You should be able to see sections like Java, Database below the Cloud Services section. If you cannot find these sections, click on Customize Dashboard on the top right.

Java Cloud Service is a component of Oracle's SaaS offering which allows to bring data center directly to cloud. It is a one stop shop for all Java Enterprise Edition needs.
In this blog, we will see the step by step process to create an Oracle Java Cloud Service Instance.
Following are major steps involved -
1) Creation of Trial account - For this blog, we will go with a trial account
2) Generate SSH keys
3) Create an Oracle Database Cloud instance
4) Create an Oracle Java Cloud Service instance
Creation of Trial Account:

2) Following screen would be shown with the steps to create Oracle cloud account. Click on View Details & Sign Up.

3) On the following screen, click on Get started for free button.

4) Fill up the details on the next few screens and submit. A trial account would be created.

5) You would receive a mail with Oracle cloud access details. Please note the username and password in the mail. Using this username and password, Sign in to https://cloud.oracle.com.
Once you click on SignIn, you would see the following screen. Choose the data center and click on My Services to login. You can find the details of your data center in the access mail you received.

6) In the next screen, enter the identity domain, user name and password. If you are logging in for the first time, you would be prompted to change the password and update some security questions.
7) Once you have successfully logged in, you would see the Dashboard screen.
This way you can successfully create a Trial account.
Generate SSH Keys:
There are many ways to generate SSH keys. In this blog, we will create them through PuttyGen.
1) Install PuttyGen into your system. Click on PuttyGen. Following browser would appear.
Before generating the key, choose the parameters as follows.
- Type of Key - SSH-2 RSA
- Number of bits should be 2048
Now click on Generate button.

2) Once you click on Generate, following screen would appear. In the blank space above Actions, keep moving your cursor to create some randomness until the key is generated.


4) Enter the passphrase for the key.

5) Key Generator generates two keys - public key and private key.
In order to export private key, click on Conversions -> Export OpenSSH key.

Save the private key in a location with .prv extension.

6) You can find the public key in the "Public key for pasting into OpenSSH authorized_keys file" section. To export the public key, manually copy the key from this section and save it in the same location as private key with .pub extension.


In this way, we have both public and private key pair generated.
Create an Oracle Database Cloud Instance:
1) Login to https://cloud.oracle.com as mentioned in Creation of Trial Account section.

2) Following screen would appear where you can choose which section to appear and which to be hidden in the dashboard. Click on Show icon next to Database and Java, so that these two can be seen on dashboard.

3) The dashboard gets updated with Java and Database sections.


6) Database Cloud Instance console contains multiple tabs like Services, Activity, SSH Access etc. As you have not created any service yet, the screen will show a message that you do not have any services.
To start provisioning a Database Cloud Service, click on Create Service button in the console.


11) Service Details page will open. In this page, we will enter all the configuration details required to setup an Oracle Database instance.


Sometimes you would encounter the following error when you click on next in the above screen.
"Error: Creation of cloud storage container, Storage-XXX/XXXX", failed: Unexpected error occured".
This error is specific to creation of storage container. In order to avoid this error, you can create the storage container separately and associate it here. When the storage container is already existing, you will have to uncheck the "Create Cloud Storage Container" check box.
How to create Storage Container:
Go to home page -> Dashboard, Click on Storage. If you do not find Storage, use the Customize Dashboard to show the Storage section.

Enter the Storage container name. Select Storage Class as Standard. Now click Create.


9) Once the JCS instance is created, you can view the details as follows.
In this way, an Oracle Java Cloud Service instance is created.
Once the DB Cloud Instance and JCS Instances are created, dashboard looks as follows. You can see that the instances count are one for both of them.

Let's quickly explore the different consoles of JCS.
You can find the complete service instance details here.
Overview: This section on the left shows the number of the nodes in the instance.
Administration: You can find the details about any applicable or applied patches.
Service Overview: In this section, you can find the summary of Java Cloud Service instance element details like the number of Compute units, Memory allocated, Storage and the number of Public IPs.
Weblogic Resources: This section in the center shows the details of Admin server domain, which includes Admin and Managed server information, and the coherence layer.
Load Balancer Resources: As the weblogic cluster is 2, load balancer instance has been created. You can find the details in this section.
Associations: This section shows the associated instances. In this case, DB cloud instance is the associated one and hence you can see it here.
Through this screen, many operations can be performed on Java Virtual Machines(JVMs) like starting, stopping JVMs, scaling, backups, patching, etc.


Go back to the Java Cloud Service Instance Console. Click on the properties icon on the right of the newly created JCS instance. You can find the links to several consoles here.
Weblogic Service Console - This console provides the means to perform management operations on weblogic servers like start, stop, restart, deployment of java services, etc.
Fusion Middleware Control Console - This console is specifically for Fusion Middleware components like SOA, BPEL, etc
Load Balancer Console - Oracle Traffic Director console to perform operations on load balancer instance.

Referred links: http://www.oracle.com/webfolder/technetwork/tutorials/obe/cloud/javaservice/JCS/Get_Started_with_JCS/Get_Started_with_JCS_OPCM.html

3) The dashboard gets updated with Java and Database sections.
4) Now click on Database -> View details. It will open an overview screen which will show details about the plan or service details for your account. Click on Open Service Console button at the top right.

5) Click Go to Console.

To start provisioning a Database Cloud Service, click on Create Service button in the console.

10) Screen will navigate to Basic Service information section. Enter the below details.
- Service Name - Name as per your choice. PGJCSDB in my case.
- Description - Optional description about the instance to be created. Can be anything.
- Notification Email - Will be defaulted by your email address associated with the account.
- Service Level - You do not need a Virtual Image. Hence, choose Oracle Database Cloud Instance
- Metering Frequency - Can be Hourly or Monthly. Choose Monthly
- Software Release - Cloud instance can be created on both 11g and 12c versions. Here we use Oracle Database 12c Release 1
- Software Edition - Enterprise Edition would suffice
- Database Type - Single Instance
Once the above details are filled out, click on Next button.

- DB Name - Defaulted to ORCL.
- PDB Name - Defaulted to PDB1.
- Administrative Password and Confirm Password - Enter the password that you would want to use to connect to this cloud DB.
- Usable Data Storage - Change to 15
- Total Data File Storage - Once Usable Data Storage is modified, this field gets updated accordingly
- Compute Shape - Through this field, you can choose the CPU and Memory required for the DB. In this case, OC3 - 1.0 OCPU, 7.5 GB RAM
- SSH Public Key - Here we would use the public key generated through PuttyGen in the initial steps.

Click on Edit adjacent to SSH Public Key field, choose the .pub key from the location where we initially saved.


- Backup Destination - Both Cloud Storage and Local Storage
- Cloud Storage Container - This is the location where the backup files would be stored. As the storage container does not exist, we would need to create it as part of this step. Format of storage container - Storage-<IdentityDomain>/storagename. In my case, Storage-pgcloud/dbcsbackup
- Username and Password - Credentials of the cloud account
- Create Cloud Storage Container - Check the field as a new storage container needs to be created.

Sometimes you would encounter the following error when you click on next in the above screen.
"Error: Creation of cloud storage container, Storage-XXX/XXXX", failed: Unexpected error occured".
This error is specific to creation of storage container. In order to avoid this error, you can create the storage container separately and associate it here. When the storage container is already existing, you will have to uncheck the "Create Cloud Storage Container" check box.
How to create Storage Container:
Go to home page -> Dashboard, Click on Storage. If you do not find Storage, use the Customize Dashboard to show the Storage section.

Enter the Storage container name. Select Storage Class as Standard. Now click Create.

Once the Storage Container is created, you can see them in the Container list. The path for the container would be as follows - <StorageName>/<ContainerName>
Storage name - The name as shown on the top left. Here - Storage-pgcloud
Container name - Here - dbcsbackup

If you do not encounter the storage container issue, proceed to the next step, which will show the Confirmation page of DB Cloud instance.

If all the information is correct, click on Create. Oracle Database Cloud Instance creation process would start now. You would see the following screen. Typically, creation of this instance would take 10-20 minutes or even more. Mine took around 2 hours.

Once the DB cloud instance is created, you can find the details in console as follows.

Create an Oracle Java Cloud Service Instance:
1) Similar to the first point of Create Oracle Database Cloud instance, go to the cloud dashboard.
2) Click Java -> Open Service Console.


3) Click on Go to Console.


4) In the Java Cloud Service console, click on Create Service -> Java Cloud Service.

5) Enter the basic service information in the following screen.
Click next.
- Service Name - As per your choice. In my case, PGJCS
- Service Description - Meaningful description for the service instance.
- Notification Email - Default mail address associated to your account
- Service Level - For this blog, we will go with Oracle Java Cloud Service
- Software Release - Oracle Weblogic Service 12c, 12.2.1.2
- Metering Frequency - Monthly
Click next.

6) Enter the detailed Service information in the next screen.
Weblogic Configuration:
- Compute Shape - Choose the CPU, Memory to be allocated to the VM through this field. I chose OC3 - 1.0 OCPU, 7.5 GB RAM
- SSH Public Key - Click on edit button, navigate to the location of ssh key and choose the .pub file created in Generate SSH Keys section.
- Cluster Size - Defines the number of managed servers in weblogic cluster. Set it to 2.
Weblogic Access:
- Local Administrative Username, Password - create a username and password for admin access.
Database Configuration:
- Name - In the dropdown, you would find the option of the DB instance you created in the previous section. Choose that.
- PDB Name - Gets defaulted based on the DB instance selected.
- Administrator Username and Password - These would be the credentials that you gave while creating Database Cloud instance.

Load Balancer:
- Load Balancer - If cluster size is one, this field will be defaulted to No. If the cluster size is more than one, this field will be defaulted to Yes. As we need load balancing, we will leave it to Yes.
- Compute Size - Choose the Oracle Compute Units and Memory. In this case, OC3 - 1.0 OCPU, 7.5GB RAM.
- Add Another Active OTD Node - No. We need only one instance of load balancing. Hence, we do not need to add Oracle Traffic Director.
- Load Balancer Policy - Least Connection Count.
Backup and Recovery Configuration:
- Backup Destination: Both Cloud Storage and Local Storage
- Cloud Storage Container - Follow the same convention as mentioned in DB Cloud instance section.
- Storage-<IdentityDomain>/<ContainerName> Eg:Storage-pgcloud/jcsbackup
- Username and Password - Credentials of the cloud account
- Create Cloud Storage Container - Check
Click Next.

7) If the storage container gets created successfully, you will get a success message and a confirmation screen will all the entered details. If all the details are correct, click on Create.


8) Java Cloud Service creation is in process now.

 |
| Java Cloud Service Instance Console |
Once the DB Cloud Instance and JCS Instances are created, dashboard looks as follows. You can see that the instances count are one for both of them.

Let's quickly explore the different consoles of JCS.
Explore Java Cloud Service Instance:
In the above mentioned section, click on the name of the newly created JCS instance (In my case PGJCS).You can find the complete service instance details here.
Overview: This section on the left shows the number of the nodes in the instance.
Administration: You can find the details about any applicable or applied patches.
Service Overview: In this section, you can find the summary of Java Cloud Service instance element details like the number of Compute units, Memory allocated, Storage and the number of Public IPs.
Weblogic Resources: This section in the center shows the details of Admin server domain, which includes Admin and Managed server information, and the coherence layer.
Load Balancer Resources: As the weblogic cluster is 2, load balancer instance has been created. You can find the details in this section.
Associations: This section shows the associated instances. In this case, DB cloud instance is the associated one and hence you can see it here.
Through this screen, many operations can be performed on Java Virtual Machines(JVMs) like starting, stopping JVMs, scaling, backups, patching, etc.


Go back to the Java Cloud Service Instance Console. Click on the properties icon on the right of the newly created JCS instance. You can find the links to several consoles here.
Weblogic Service Console - This console provides the means to perform management operations on weblogic servers like start, stop, restart, deployment of java services, etc.
Fusion Middleware Control Console - This console is specifically for Fusion Middleware components like SOA, BPEL, etc
Load Balancer Console - Oracle Traffic Director console to perform operations on load balancer instance.

Referred links: http://www.oracle.com/webfolder/technetwork/tutorials/obe/cloud/javaservice/JCS/Get_Started_with_JCS/Get_Started_with_JCS_OPCM.html
Very Useful blog. Everything clearly explained step by step.
ReplyDeleteWaiting for few more like that.
Thank you.
DeleteThanks for sharing this blog. The content is beneficial and useful. Very informative post. Visit here to learn more about Data Warehousing companies and Data analytics Companies. I am impressed by the information that you have on this blog. Thanks once more for all the details.Visit here for Top Big Data Companies.
ReplyDelete